Engineered Wood
Installation Instructions
|
*Carefully read these instructions before you start. Check whether the floor panels are undamaged and fault-free, since the guarantee only applies to hidden defects.
|
IMPORTANT NOTE
Place the material in the room in which the installation is to be done, without opening the packing, and allow it to acclimatise for at least 48 hours.
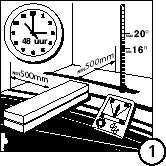
The material should be placed flat on the floor in the horizontal position, at a distance of at least 50 cm from the wall (see figure 1)
WHAT YOU WILL NEED
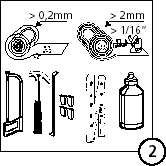
The floor panels have a groove and a tongue all round, that enable the floor panels to be fitted into each other mechanically. The only tool that you need is a hammer, a fine-toothed saw,a folding ruler, a tensioning wire (cord) along the length of the room, a set square, and a click installation set that consists of a click stop block, a stop iron and spacer blocks (see figure 2).
STORAGE
The room in which you will be installing the floor panels should be dry. In case of new buildings, wait until the concrete floor if any is dry. The floor panels should be installed at a room temperature of at least 16° C, and a maximum 20° C. The relative air humidity in the room, to be measured using a hygrometer, should not be less than 40% and not exceed 65%. The humidity should also remain within these limits during and after the installation. If the floor panels are going to be stored (in the packing) or long periods of time, such storage should always beat room temperature. The storage space should have an average relative humidity not exceeding 65%.The floor panels should not be stored in a room with a high level of humidity.
BEFORE STARTING INSTALLATION
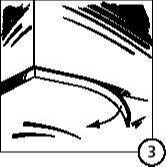
Your floor has been manufactured with the best possible care. However, we would still advise you to check the floor panels for visible deviations such as damage, extreme colour differences and shape or dimensional deviations. Complaints concerning visible deviations will not be entertained after floor panels have been installed. Ensure good lighting when installing the floor. You may remove the existing skirting boards and reinstall them after installation (see figure 3).
To enable the floor to shrink and expand freely under the skirting boards, end-piece and transition skirting boards should be fixed on the walls. In other words, these skirting boards should not be fixed on the floor panels. Flat, self-adhesive skirting boards may be affixed to the floor panels.
|
Sub-Floors
Click floor panels can be installed on practically any subfloor. This subfloor should however be permanently dry, hard, flat, clean, and have adequate load-bearing capacity. A floor is flat if there is less than 2 mm height difference over a distance of one continuous meter.Unevenness exceeding 2 mm/meter should be levelled out. |
CONCRETE SUB-FLOORS
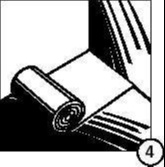
A concrete floor should not contain more than 2% moisture. You should install an insulating layer on top of this. A 3 mm underlay will be adequate from the technical point of view (see figure 4). You should also always install a moisture insulation foil (for example building foil). Joints should be thoroughly sealed. The foil should extend behind and up the full height of the skirting board.
WOODEN SUB-FLOOR
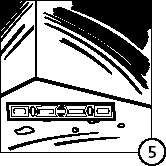
If the sub-floor is wooden (moisture content of wood 10%, with a tolerance of ± 2%), check it for loose parts and tighten the same in place (see figure 5). Your supplier can carry out the required measurements using an OM meter. You may level the floor by sanding it down or installing a chipboard sheet. A 3mm underlay will be adequate from the technical point of view. But a 7 mm soft board plate has a better levelling effect and is recommended for floors with slight differences in height. Do not lay the boards if the crawl space is wet. Always make sure there is sufficient ventilation to allow the sub-floor to ‘breathe’. Do not install floor panels in a wet crawl space.
|
Under-Floor Heating
If you want to lay a wooden floor on top of under-floor heating, there are certain rules you must follow. It is important to know what type of under-floor heating is being used, also the type of sub-floor underlay and the type of parquet. We advise that before you buy parquet you always first ask your supplier for advice. |
|
Requirements With Regards To Noise Reduction
There are situations where a sound-damping sub-floor is required. Your supplier has various kinds of sub-floor underlay that meet these requirements. Ask for the test report. Make sure that if you are using click laminate flooring that the underlay is no more than 3 mm thick to avoid too much pressure being exerted on the joints. This will cause the parquet to bow or crack. |
Modification of Doors
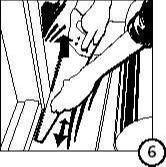
Check whether your doors can open and close with the combined height of the flooring and your sub-floor if any. If not, you may modify (shorten)your doors according to the changed situation (see figure 6).
LAYING INSTRUCTIONS LEVEL 1: FLOATING OF ENGINEERED PLANK WOOD FLOORING
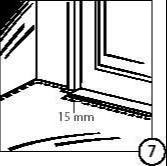
The boards are laid ‘floating’ by gluing the panels together using water-proof PVAC wood glue (D3 wood glue). If the humidity level and temperature change, the floor may shrink or expand to some extent. For this reason, a play of 15 mm should be maintained with respect to all fixed boundaries such as:walls, thresholds, columns and central heating pipes (see figure 7).
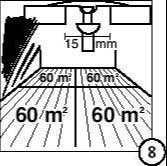
Movement joints should be installed if floors are more than 12 m long or more than 6 m wide, as well as near door openings, between rooms, at turns in passages, etc (see figure 8)
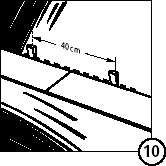
These movement joints may be finished using specially developed dilatation joint profiles. There should be an offset of at least 40 cm between the top ends of the floor panels in consecutive rows.
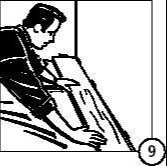
1. After the sub-floor underlay has been laid, the next step is to start laying the boards. We recommend that you start in a corner of the room which is immediately visible when entering the room (see figure 9). First calculate the number of tracks that you will be laying. You will obtain best results if the first and the last track are of approximately the same width. Now, lay the first panel with the groove of the length facing the wall. Usually, the panels are laid length ways in the house (in the direction of the light).
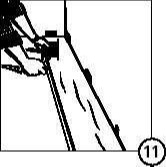
2. An expansion joint of around 15m should be installed all around the floor. Place a spacer block at every 60cm (see figure 10). Remove them 24 hours after the floor has been laid. Now place the second floor panel, and so on, until the installation of the first row of floor panels is completed. Now check whether the first row is fully straight by tensioning a rope along the length (see figure 11). After the third row has been laid, check again if the floor is level.
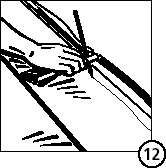
3. If the wall is not fully straight, you should transfer the unevenness to the floor panels. This may be done using a spacer with a lead pencil (see figure 12). After the floor panels have been marked out, saw the same as required so that the recesses, etc., fit together. Keep in mind the expansion joint.
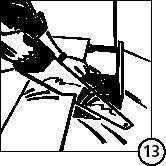
a) Use a fine-toothed saw for the purpose. If a hand saw is used, make sure the décor side is facing upwards;if a jigsaw is used, keep the décor side facing downwards (see figure 13).
4. Lay the first row of panels by gluing each subsequent panel on the short side. In the second row, start with the remaining part of the first row (see figure 14).
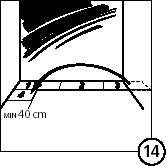
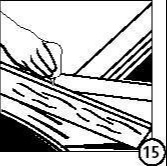
a) This part however, must be at least 40 cm in length, so as to ensure that the floor has optimum stability and also to ensure minimum loss of material. The panels should be glued along the entire length and width. Do not use too much glue! (see figure 15)
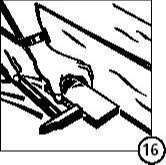
5. To tighten, use the stop block of the solid floor parquet-laying set. You can also use a wooden fillet of at least 30 cm (see figure 16).
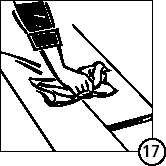
a) This is to avoid damage to the panels.After the panels have been tightened,remove any residual glue immediately with a slightly moist cloth (see figure 17). After the glue has dried, it will be almost impossible to remove any residue.
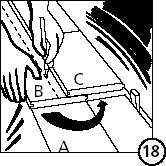
6. While fitting the last row of floor panels, lay the floor panels with the decorative side down with the groove against the wall. Now make the required markings and cut with the saw (see figure 18). Also keep in mind the prescribed expansion joint of 15 mm, and that the floor should be free all round.
If it is difficult to reach the last row, lay the boards one by one as close as possible against the boards of the last row but one. Then push them together lengthwise using a pull iron and a hammer. The cross-cut ends are tightened using a stop block or a pull iron and hammer.
|
After Installation
You may start using the floor immediately after installation. You may now start finishing operations on the floor. The spacer block should be removed immediately. You may also start installing the skirting boards. In the case of pre-oiled floors, it is advisable to apply maintenance oil to the floor after installation. |
MAINTENANCE
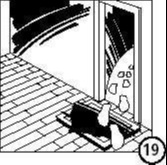
Good maintenance will increase the life of your floor. For proper maintenance, we refer you to your sales point. Protect your floor by placing a good floor mat near the door in order to prevent the entry of sand. We also advise you to protect your furniture and chair feet with felt (see figure 19).
| Guarantee This engineered floor has been manufactured with due care. If however, hidden material and/or manufacturing defects appear within 10 years of the date of purchase, you may contact your sales point on presentation of your payment receipt. |
| Cancellation of Guarantee The guarantee will not apply in case of damage due to improper use, falling objects, entry of sand and/or processing with a sharp object. If the floor is installed in a damp room. In case of rough and/or improper use.The guarantee will also lapse in case of any other careless use of the product in question, if a defect in the product could have been detected even before processing. Important: Preserve your payment receipt as a guarantee certificate |

TrueWood provides quality oak flooring with authentic finishes at affordable prices. Using new technologies we are able to make a product that exudes character and feels real to the touch.
The Mark Of Distinction.